How to Start a Podcast: Complete Step-by-Step Guide (2026)
I’ve been teaching people how to podcast since 2007. In that time, I’ve seen every mistake, shortcut, and dead end this medium has to offer. What follows is the guide I built from all of it – a complete launch blueprint that takes you from raw idea to your first 100 listeners, step by step, with nothing important left out.
We cover planning, equipment, recording, editing, hosting, distribution, and growth – plus our own PATH and SCALE frameworks that you won’t find anywhere else. Let’s go…
How to start a podcast: the 10 steps
Click any step to jump straight there.
| 1. Plan your show Use the PATH framework | 2. Choose your format Solo, interview, or co-hosted |
| 3. Build your brand Name, music, and cover art | 4. Get a microphone USB mic for most beginners |
| 5. Pick your software Alitu or Audacity to start | 6. Record your episode Mic technique and room setup |
| 7. Edit your episode Clean up and export | 8. Choose a host Where your RSS feed lives |
| 9. Submit to directories Apple, Spotify, and more | 10. Launch and grow Your first 100 listeners |
What does it cost to start a podcast?
This is likely one of the very first questions you have, and that’s totally fair. There are some one-off startup costs for equipment, and then ongoing monthly fees for the software needed to record, edit, and publish your show.
| Level | Kit | Recording & Editing Software | Hosting | Est Monthly |
| Free | Smartphone | Audacity (free) | RSS.com (free tier) | $0 |
| Standard | Samson Q2U ($80) one-off | Alitu ($38/month) | Alitu ($38/month) | $38 |
| Pro | Shure MV7+ ($300) & Focusrite Vocaster ($75) one-off | Alitu ($38/month) | Captivate video hosting ($40/month) | $78 |
Step 1: Plan your podcast with the PATH framework
Right, let’s create this show! First is the idea behind it, and the strategy. What does it look (sound…?) like?
I’ve developed a framework called PATH. It’s a podcast plan built for compelling content and consistent growth:
- Purpose: why am I doing it?
- Audience: who am I talking to?
- Topic: what am I talking about?
- Hallmark: why should they listen?
Purpose: Why are you making this podcast?
There are two layers here.
Your functional purpose is what you want to achieve: marketing and brand-building, creative expression, community, education, or pure entertainment.
Your personal purpose is deeper. It’s why you need to create this. The reason you’ll still be doing it in 5 years when downloads are slow, and life gets busy. Maybe you survived something hard and want to help others through it. Maybe you’re obsessed with a topic and can’t not share it. The functional purpose is the goal. The personal purpose is why it’s worthwhile, whether you hit that goal or not.
Audience: Who is your podcast for?
You need an ideal listener, but most people stop too early. They describe their listener and move on. The magic is in going deeper.
Your audience has surface-level interests. But underneath? There’s always a deeper pain, fear, or desire.
🏊♂️ Surface: “I want to learn marketing”
🤿 Deep: “I’m paralysed by contradictory advice. Just tell me what to focus on.”
🏊♂️ Surface: “I want commute entertainment”
🤿 Deep: “Everything feels heavy. I need someone to make me laugh.”
🏊♂️ Surface: “I want to grow my business”
🤿 Deep: “I’m working myself to death and have nothing to show for it.”
Find that deep pain, and everything gets clearer: your topic, your content, your growth strategy. Every episode, every title, every social post should speak directly to it.
Topic: What transformation do you deliver?
Your topic is the solution to that deep problem. Not “a marketing podcast” but “no-BS prioritisation for overwhelmed founders.” Not “entertainment” but “your daily dose of joy when everything feels heavy.”
Every podcast delivers a transformation:
- Educational → “I can now confidently do X”
- Entertainment → “I feel lighter and part of something”
- News → “I understand what matters and why”
- Interview → “I see new possibilities”
That transformation might happen in 20 minutes or over 20 episodes. But it’s real, and it’s what keeps people coming back.
Hallmark: Why should they listen to your show specifically?
When you’ve done the work above, your hallmark often emerges naturally. But let’s make it explicit. What makes your delivery unmistakably yours?
- Tight niche: the more specific the problem, the more specific the solution
- Personal angle: your background or perspective nobody else has
- Unique format: structure, length, segments, interactive elements
- Production quality: sound design and polish that sets you apart
- Distinct outcome: the specific feeling listeners walk away with every time
Nail this, and you’ll always know exactly why someone should listen, and why they’ll come back and bring friends.
PATH framework examples: health & fitness, pop culture
Let’s lay out a couple of examples of a nicely defined PATH, so we can see how it works.
The Health & Fitness Show
Purpose: Growing a personal training business, driven by years of hating his own body and believing he was too far gone to change. Nobody should feel that hopeless.
Audience: People in their 30s-40s who are significantly overweight and have failed multiple diets.
- Surface: “I want to lose weight and get fit”
- Deep: “I’ve failed so many times I feel broken. I’m embarrassed to even try. I need someone who gets it.”
Topic: Realistic fitness transformation for people who think they’re too far gone. From “it’s hopeless” to “small actions are actually working.”
Hallmark: A personal trainer who was once 80 pounds overweight. Real talk, not motivational BS. Every episode includes a short HIIT workout (under 10 minutes) with modifications for people starting from zero.
The Pop Culture Podcast
Purpose: A creative outlet for a zombie film obsessive who always felt like the “old guy” in online communities. He wants a space where older fans feel at home.
Audience: Zombie fiction fans in their 40s-60s.
- Surface: “I love zombie films and want to talk about them”
- Deep: “Everything online is aimed at 20-somethings who only know The Walking Dead. I want to geek out about the classics with people who remember them.”
Topic: Zombie film analysis that honours the classics and connects generations of fans. From “I’m too old for this fandom” to “there’s a whole community of us, and our perspective matters.”
Hallmark: Strictly zombie films (not all horror, not all post-apocalyptic). Bridges Romero-era classics with modern takes. Every episode features a guest from a different generation to spark that intergenerational conversation.
Notice how in both cases, the deep problem led naturally to a specific solution, which made the hallmark obvious? That’s PATH working as it should. Know your why, your who, and your transformation, and the how takes care of itself.
Step 2: Choose your show format and episode structure
Now that we know what kind of show we’re creating, it’s time to figure out how it looks! (or sounds…?). So, when looking at how to start a podcast, what are the most common questions about how it’s delivered?
Solo, co-hosted, or interview: which format is right for you?
The format you choose is really personal and depends on who’s involved. It’s totally up to you!
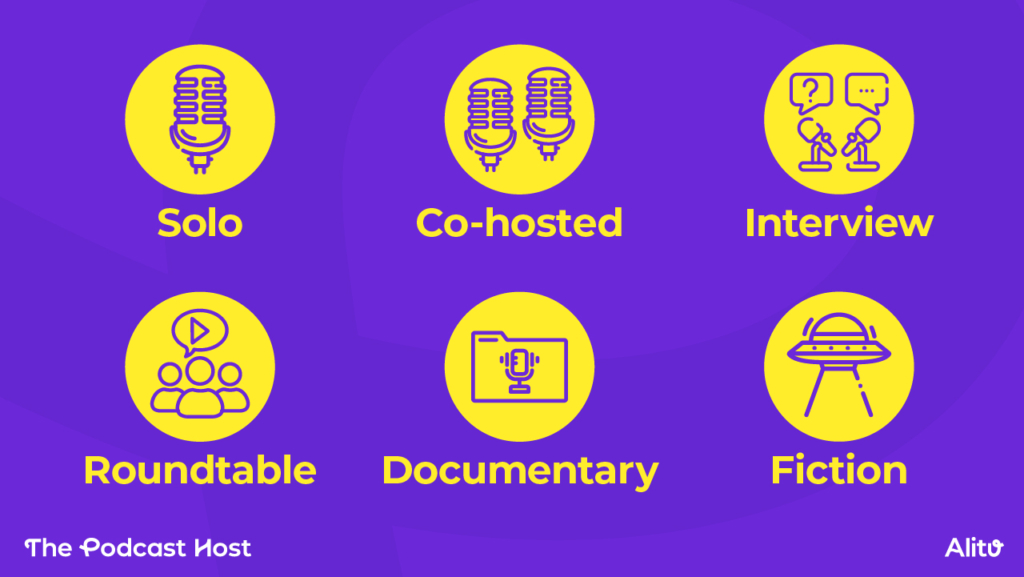
So, what are the common types of podcast show formats?
The Solo Podcast
Also known as the monologue. You record (sing along!) “all-by-my-seeeeelfff!”
Pros 👍
- Don’t rely on anyone else
- No scheduling conflicts
- Building a reputation individually as the authority
- You call the shots on sponsorship and monetisation
- No need to split the profits with anyone.
Cons 👎
- Intimidating to record alone for the beginner podcaster
- Takes practice to avoid a monotone sound
- Can be less engaging than a conversation
The Co-Hosted Podcast
Presenting alongside a friend or colleague.
Pros 👍
- Avoids the ‘mic fright’ of recording alone
- Good co-hosts create great chemistry and engaging content
- Builds long-term loyalty with two or more hosts
- Can set up a regular recording time to reduce scheduling admin
Cons 👎
- Needs careful agreement over ownership and responsibility
- Need to split earnings
- Have to manage two people’s schedules
The Interview Podcast
‘Borrowing’ the expertise or entertainment value of others.
Pros 👍
- Talk to your heroes, or other really interesting people
- Bring in different points of view & varied expertise
- Grow your network
- Some growth benefits if they share the episode
Cons 👎
- Interviewing is a real skill: it’s hard to do a great interview
- Need to constantly find and approach potential guests
- Booking logistics, and scheduling interviews
- Builds less loyalty since it’s a new person every week
- And less spotlight on building your brand
How long should podcast episodes be?
This always depends on your content, but here are some stats on average podcast episode length:
- Short: Under 20 minutes
- Medium: 20 to 45 minutes
- Long: More than 45 minutes
Don’t worry too much about these figures, though. Ultimately, your episode lengths should be decided by two things.
- Your content
- Your audience
If you have 50 minutes of valuable, relevant content, why chop it down to 20? Or likewise, if you’ve said everything you have to say in 10 minutes, why pad it out to 30? If you do go super-long on an interview, just cut it down into two episodes!
Finally, length can actually be a ‘unique’ factor, as I mentioned earlier. Short and snappy 4-minute episodes could suit a certain type of listener, or huge 3-hour in-depth interviews might suit another. Think about whether length might be a deliberate, unique choice for you.
How often should you release new episodes?
So, how often should you podcast? Here’s the answer:
The best schedule is normally the most frequent one that you can stick to, on a regular basis.
So, if you can only manage once a month, that’s fine. If you can manage every two weeks, even better. If you can manage weekly, that’s great.
You can still have a big impact with a fortnightly or monthly show, but people often plan their lives around what day of the week their favourite shows drop.
That said, sticking to a deadline just for the sake of it is pointless. You’ll have a bigger impact if you put out one excellent episode a month instead of a very average episode every week.
Should you start a video podcast?
It’s funny; in the early days, it was solely about audio podcasts, but these days, it all kind of blends together.
It’s possible to record a video podcast in great quality, using a lot of the call recording platforms you’ll read about in Step 5. But it does introduce a whole lot of extra factors that can make things more difficult.
Here’s my take:
- Don’t believe the hype; you don’t NEED to do a video podcast. Audio podcasts are still vastly more popular, and extremely powerful. There’s also more time available in the day for folks to listen than there is to watch.
- Video (good video, at least) can be harder to create and edit. It can also make people more self-conscious, reducing the quality of the content.
So, normally, I’d recommend starting with audio-only and adding video podcasting at a later date if your audience shows a desire for it, or if it just feels like the next natural step.
How to write great podcast episode titles
This is the final thing around formatting, and a really important one to be found in search. Choosing good descriptive episode titles is vital!
Here are two mistakes I see all the time!
😵 DON’T include “Episode 1” or episode numbers.
😵 DON’T include the guest name at the start
Episode numbers or unknown names just get in the way of the ‘hook’. Because the goal of your title is one thing, and one thing only: give them a reason to listen that they just can’t ignore!
- What’s the real meat of the episode?
- If there’s one key takeaway or solution here, what is it?
Some examples of great podcast episode titles are:
- Why You’re Always Tired, & What to Do About It
- How to Launch an Online Business with No Money
- Get Fit in 30 Days With These Simple Strategies
Step 3: Build your podcast brand (name, music, artwork)
In the world of podcasting, your brand is in all three realms:
✏️ Written: your podcast name
🎵 Audio: music and voice
🖼️ Visual: podcast artwork
Let’s get that sorted before we get into making the thing!
How do I choose a podcast name?
No “how to start a podcast” guide is complete without answering this most common of questions: What the flip do I call the thing?
There are three main camps for choosing a podcast title and naming your show.
- The Clever Name – A catchy or creative title that stands out, but pair it with a descriptive tagline so listeners can actually find it when searching.
- The Descriptive Name – Simply name your show what your audience is already searching for. Less flashy, but great for discoverability. You can still add a little personality to keep it from feeling flat.
- Your Own Name – Best avoided unless you’re already well-known. If you want to use it, add a descriptive element (e.g. Rock Climbing with Mike Smith) so people know what they’re getting.
Finding music for your podcast
There’s no rule to say your show must have music, but many podcasters include a theme to add a bit of polish.
With podcast music, less is more. Keep any intro shorter than 10 seconds, and fade into your voice from there. If you go beyond 10 to 15 seconds, you’ll just train your audience to hit the skip button.
Two great options for finding podcast-safe music are Shutterstock and Epidemic. You can pay monthly to use all of their music and SFX.
How to create podcast cover art
First impressions matter. Your cover art needs to stand out among thousands of shows in Apple Podcasts and Spotify.
- The basics: Go for 3000x3000px (jpeg or png), keep text short and large, and make the overall design bold and simple so it pops as a small thumbnail.
- Creating it: Canva is a great free option with ready-made podcast templates, or hire a freelancer if you’d prefer a professional touch.
Think of your artwork like your podcast name: it needs to balance descriptiveness, personality, and clarity, all in a single image that still works on a tiny phone screen.
Step 4: Set up your podcast equipment
Once you’ve done the groundwork and planned out your show, it’s time to get to work recording your first episode.
This is where it’s really, really easy to overcomplicate things. Instead, let’s keep it simple, because the bare minimum you need to podcast is a recording device and the internet!
Smartphone recordings can actually be just fine to start out (hold it to your face like you’re doing a call, and hit record!). But, using an external USB microphone is a wise, low-cost upgrade that won’t complicate things.
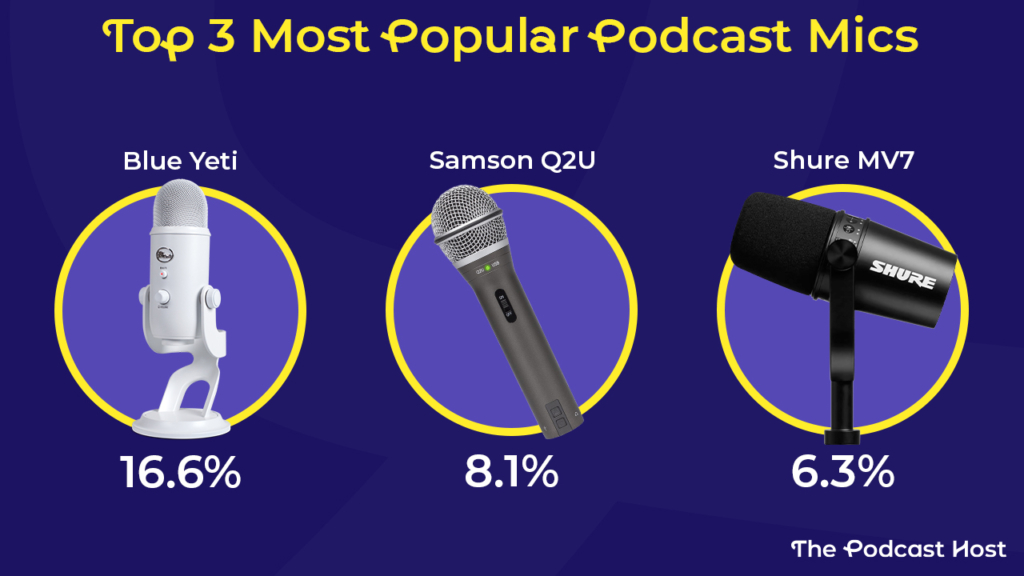
The best podcast microphone for beginners (our top pick: Samson Q2U)
What is the best podcast microphone for aspiring and early-stage creators? The Blue Yeti might be the most popular, but it’s the Samson Q2U I always recommend to new podcasters. It’s cheaper, sounds better, and you can use it in both USB and XLR form!
The Shure MV7+ is a great mic, too. It’s more expensive than the other two, but it sits in the “high-end” bracket. I’d only recommend buying one if you’ve been podcasting for a while and have a decent budget behind you.
Can I start a podcast with just my phone?
Yes! Smartphones are powerful little devices, and there’s nothing to stop you running your entire podcast on yours. Recording on your phone is a great, low-barrier, no-cost way to test out whether you like podcasting, too.
If you plan to use your phone beyond a few experimental episodes, add a wireless lavalier kit like the Rode Wireless Micro or BOYA Mini. These will drastically improve your audio and are especially handy if you want to record video, too.
Recommended setups by budget: beginner, standard, pro
Here are three recommended podcast equipment and setup tiers:
| Phone Setup | Desk Setup | Studio Setup |
| Your phone (free) | Samson Q2U ($80) & Focusrite Vocaster (Optional, $75) | Shure MV7+ ($300) & RØDE RØDECaster Duo ($440) |
| Your earbuds (free) | AT-M20X Headphones ($60) | Sony MDR-7506 ($90) |
| Audacity recording & editing (free) | Alitu recording & editing ($38/month) | Alitu recording & editing ($38/month) |
| RSS.com hosting (free) | Alitu hosting (included in $38/month) | Alitu hosting (included in $38/month) |
| Prove your idea works before you spend a penny. Upgrade once you know you’ll stick with it. | Recommended tier. The Q2U will last for years. Alitu handles the technical side so you can focus on your show. | Supercharge your sound and make high-quality audio your USP. This is for creators who know they’ll still be podcasting for years to come. |
Other useful accessories (boom arm, headphones, recorders)
Mounting your mic on a boom arm doesn’t just make you look and feel like a pro; it drastically improves your presentation, too. Now, you have complete flexibility with your mic positioning, no more hunching over a desk stand, and you can even stand up to record, if you’d prefer.
My favourite boom arm is the Rode PSA1+ ($110), whilst Matthew swears by the IXTech Lizard ($60). You can even mount a Blue Yeti on a boom arm, even though it famously comes with a desk stand built in.
On the podcast headphones front, there’s a chance you might get a pair of over-ear Samson “cans” in a Q2U bundle, and I actually really like those. If you’re looking for something high-end that won’t break the bank, you’ll get a pair of Audio Technica ATH-M20Xs for about $60.
Finally, if you want to run your Q2U in XLR form, or, run any other XLR mic, for that matter, you’ll need an interface or digital recorder. I use the Rode Rodecaster II in the studio, though that’s overkill for most podcasters. Matthew uses the Focusrite Vocaster 2 as a USB audio interface, and you can get those for as little as $60.
If you don’t want to run a USB device into your computer, opt for a Zoom recorder. We’ve used those regularly over the past decade and a half, and our favourites include the Zoom H5, Zoom H6, and Zoom PodTrak P4.
Step 5: Choose your recording and editing software
Nice work, you’ve plugged in your USB microphone or your audio interface! But how do you capture a podcast recording? How do you edit the audio file? Including audio recording, removing mistakes and background noise reduction, it’s time to pick your podcast software.
The good news is that there are plenty of great packages that do both recording AND editing. Let’s take a look.
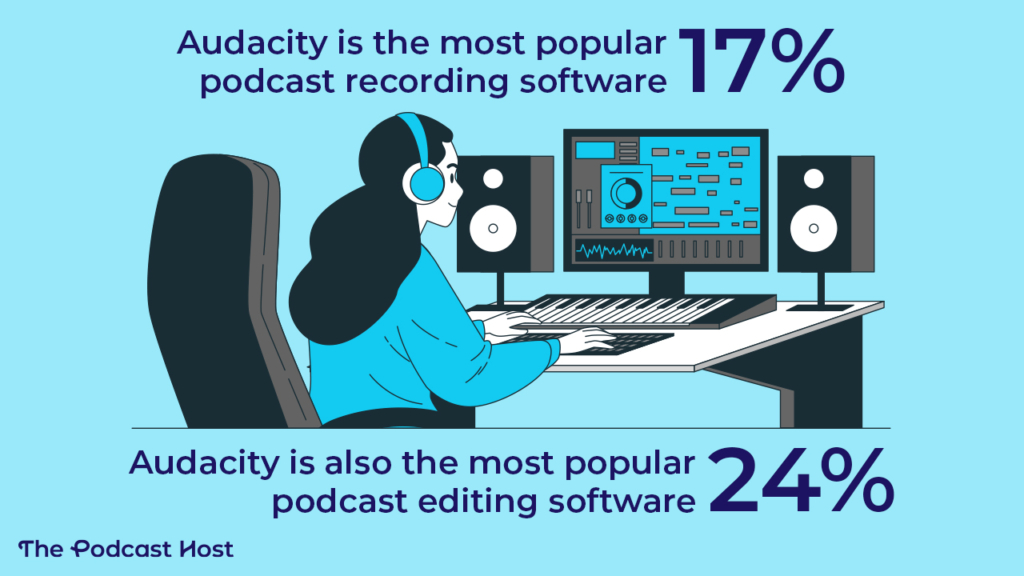
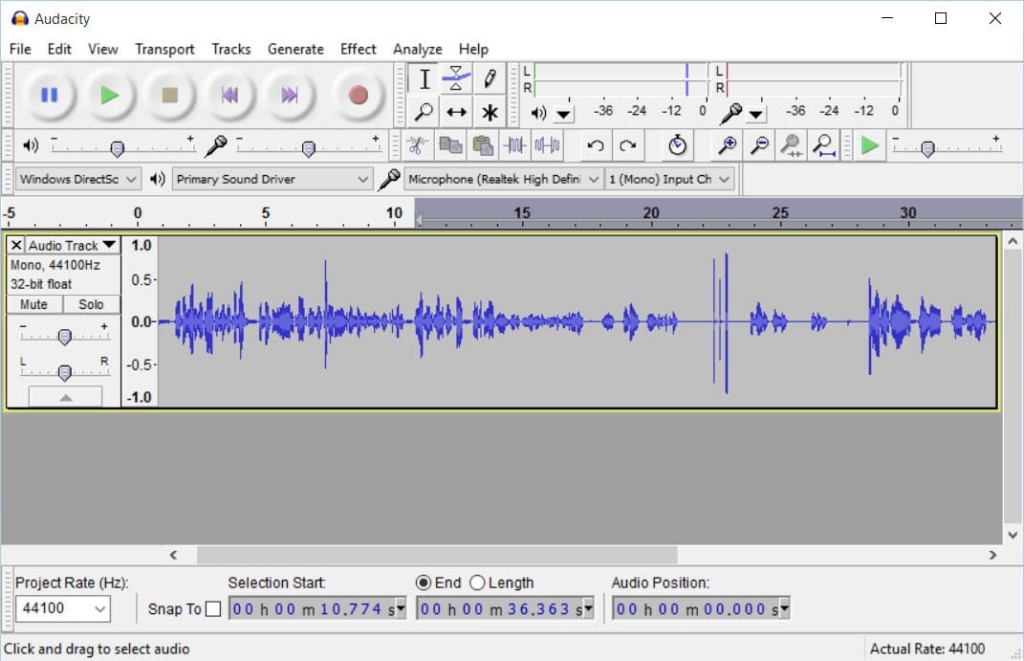
Audacity: the best free option
Audacity is the most popular recording and editing software in podcasting. It’s totally free, which makes it an obvious option for many, but it’s also a powerful and flexible platform.
Audacity always felt functional but clunky, though improvements in recent years have totally streamlined it.
With that said, it’ll still be intimidating to complete beginners and could take a bit of time to learn. Audacity also isn’t a call recording platform, so if you want to include remote guests or co-hosts, then you could combine it with Zoom for a free setup, or you might want to look elsewhere.
Alitu: the all-in-one option
Alitu started as a way to make podcast editing as quick and easy as possible. It still offers those benefits today, but has everything else you need to podcast built in, making it an all-in-one podcasting tool.
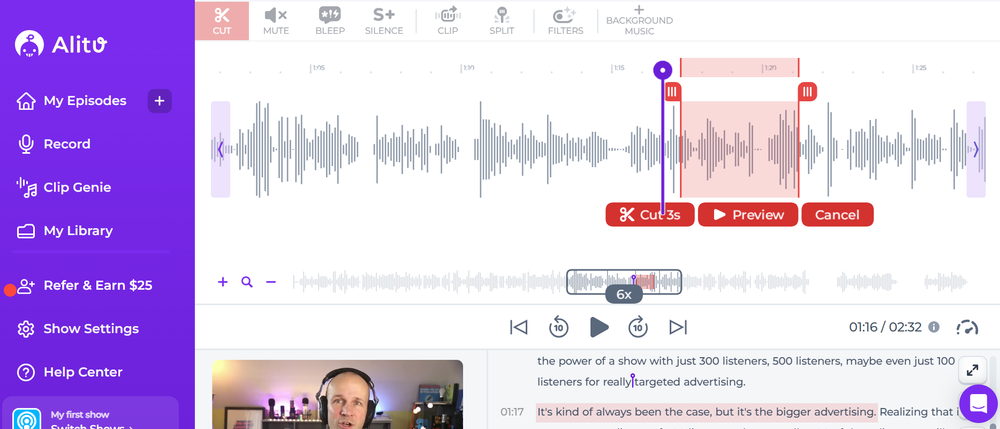
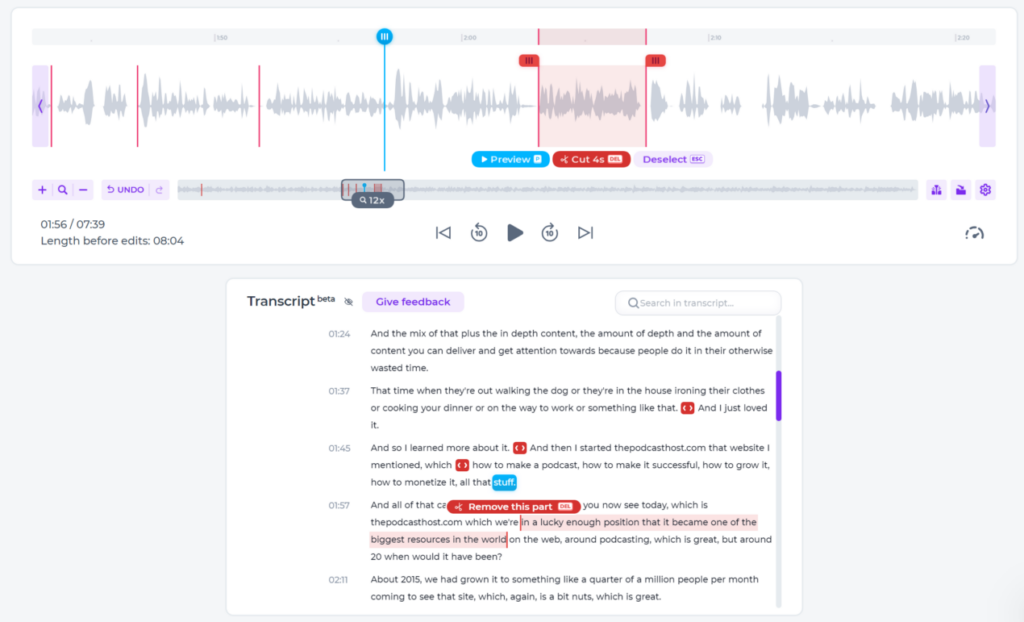
You can record solo or remotely and in audio or video. Alitu automates all the noise reduction, EQ, compression, and volume levelling for you automatically, and you can remove umhs, ahs, and long pauses at the click of a button. You can also edit video and audio by deleting text from Alitu’s automatically generated transcripts.
Alitu also has podcast hosting, so you can publish and distribute your episodes to Spotify, Apple Podcasts, and all the other apps without needing a separate login or subscription.
You can give Alitu a trial run, free for seven days, and test it all out for yourself!
Remote recording: what to use if you have guests
I’ve already mentioned Alitu, which has everything you need to record remotely. There are many other top-quality remote recording platforms out there, too, from Riverside and Zencastr to Descript and Iris.fm. Honestly, there isn’t much to split these tools nowadays.
Other podcast software options
Beyond remote recording, you also have a bounty of choices when it comes to podcast editing software. Again, you can use Alitu or Audacity for all of your editing and production needs, but platforms like Reaper, Hindenburg, and Adobe Audition are popular among podcasters, too.
Step 6: Record your first podcast episode
Time to get this thing down on tape. Or… the 21st-century equivalent, anyway! Let’s cover presentation skills and recording that audio.
How to script (or outline) your episode
Finally, we’re ready to hit ‘Record’! But what will you say? That’s where podcast scripting comes in. Here are two tips:
📃 Word-for-word scripts give you confidence & cover the details, but they’re time-consuming to write & hard to read naturally.
📃 Create a bullet-point outline to guide you, but one that keeps you flexible and conversational when recording.
The intimate nature of podcasting is far more suited to a conversation rather than a sermon. Feel free to use more detailed scripts in the early days, but try to work towards more flexible, natural outlines over time.
Mic technique: how to sound great on your first recording
Before trying to optimise your technique, you need to get used to being behind the mic and talking into it – especially if you’re recording a solo show.
This is hard when you start out, no question. Here’s some advice:
- Put a photo or teddy (?!) on a chair behind the mic, to have a ‘person’ to talk to.
- Imagine your audience avatar in your head: speak to them.
- Take confidence in the fact that you have a message to share, and there are people who want to hear it!
Feeling comfortable and confident behind the mic will take time and practice, or “reps” as they call it in the training world.
This isn’t an overnight process, and I know some very experienced and accomplished presenters who openly admit that they still get butterflies when they sit down to record.
The first few minutes are usually the trickiest, and then you’ll find your groove.
Of course, we also need to think about mic technique to help you sound your best.
A large part of this is simply the distance between your mouth and the microphone.
The optimal distance varies from person to person, because our voices vary, as do the default volumes we each seem to speak at.
But, a great starting point here is to stretch out your pinkie and thumb so their tips are the furthest away they can be from one another. Try that distance, then adjust accordingly.
If you find yourself up pretty close to it, you might also want to talk slightly to the side of the mic, rather than straight down its barrel. This will go a long way towards preventing annoying plosives.
If the room you’re recording in is quite echoey and reverberous, then I’d recommend getting up close to your mic – that can prevent a lot of the reflective sounds from spoiling your vocals.
Of course, it’s better if you record in a decent environment whenever possible, which brings us nicely to our next section…
How to treat your recording space (without spending money)
If you don’t want your podcast to sound like it’s been recorded down a well or inside a cave, then choose a room in your home with the most soft furnishings and surfaces.
Typically, this will be a bedroom. Some podcasters literally record in their closets or in front of open wardrobes, as all of those hanging clothes absorb sound waves, rather than reflect them.
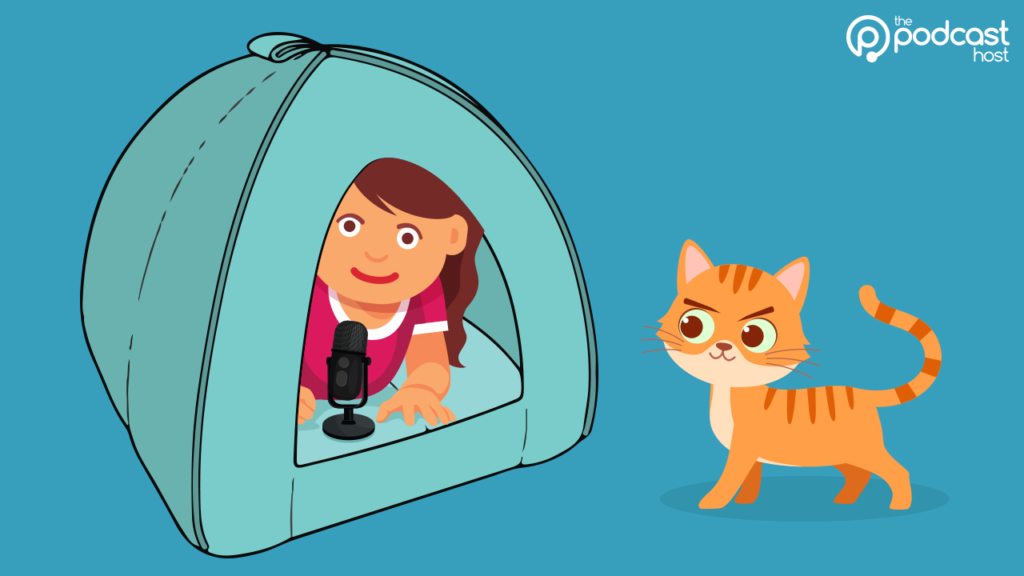
One of my favourite tricks is to pop your mic inside a cat bed or cat house, which creates a mini “studio” around it. Sound treatment doesn’t need to extend to the entire room – only the area around the mic.
Video podcast hype has made life harder for aspiring and early-stage creators because it puts pressure on them to shoot video from day one. This means you aren’t just trying to get good sound, you’re trying to make it visually appealing, too – and often, the two are at odds with one another.
So learn how to make great audio before you try to crack video. Especially if you’re recording at home with a “use what you have” approach.
What to do when you make a mistake mid-recording
There are two ways to approach “mistakes” during your recording sessions.
The first is the ‘recover and move on’ route. This is when you get slightly tongue-tied or trip over a word. These are completely natural occurrences in human speech and, honestly, I’d just recover and get on with it.
The second is if you’ve properly botched something. Maybe you’ve misread an important fact, or you realise that you’re waffling and over-explaining something and would prefer another stab at it.
For the second instance, I’ve always recommended the three-click or three-clap approach. Pause for a few seconds, then click your fingers (or clap) three times in front of the mic, take a breath, and take that section from the top.
This means that, when it comes to editing, you’ll see those edit points immediately in your waveform, which makes cutting out those mistakes a quick and easy process!
Step 7: Edit your podcast episode
Gear: check!
Software: check!
Irrational hatred of your own recorded voice: check!
But you’ve recorded it anyway. Strong move. Now, how do we polish it up nice, so it can be catapulted out into the world?
This is where you take your podcast recording, edit out mistakes, stitch together audio clips, add music or FX, and make sure it all sounds great with EQ, levelling, compression, and more. Let’s look at how it all works.
How much editing do you actually need to do?
From awkward pauses to uhms and ahs, there is no shortage of things you could edit out in the post-production phase. But it’s unlikely you’re starting a podcast to spend hours selecting and deleting sections of waveforms.
Let’s be straight – most podcasters don’t enjoy editing, it’s just a necessary part of the process if you want to make something good. So how do we get through it as quickly and painlessly as possible?
I’ve included a few of my video tutorials here because editing is such a visual thing. It’ll be much easier for you to quickly watch what I do, rather than read me trying to explain it!
The essential edits: top-and-tail, mistakes, and audio cleanup
If you’re using a tool like Alitu, you can edit by deleting text from the auto-generated transcript, and you can remove all the ums and ahs automatically at the touch of a button.
I wouldn’t recommend removing filler words manually if you’re using a DAW such as Audacity, though. It’ll just grind, become unsustainable, and make you want to quit.
In Audacity, I’d simply top and tail the file, then remove any obvious disruptions like phones ringing, doors knocking, or coughing fits.
Now and then, there might also be sections of the conversation that you will want to prune, too. But don’t over-edit, in the main. And if your crutch words bother you, use them as fuel to improve your presentation skills rather than leaning on editing as a crutch.
How to set your audio levels
Editing out mistakes is only one aspect of post-production. Cleaning up and levelling out the audio is an essential step, and can really hurt your sound if done poorly.
In podcasting, we have a loudness standard measured in what’s known as “LUFS”. This stands for “Loudness Units relative to Full Scale”.
The above video shows you how to make your episode “loud enough” in Audacity by setting mono episodes to -19LUFS and stereo episodes to -16LUFS. I’d always recommend working in mono, unless you’re making something like an audio drama or fully soundscaped documentary-style show.
Then, the video below shows you how to clean up any annoying background hiss from your audio using Audacity.
Audacity is a great podcasting editing package, but everything is very manual, and it can take a wee bit of time to learn.
If you’re using Alitu, on the other hand, then all the noise reduction, EQ, compression, and volume levelling is handled for you automatically, so you don’t need to worry about any of this.
Alitu’s noise reduction capabilities are pretty incredible, and it can rebuild your voice and bring it on-mic if you mess up your recording, too. Check out the following sound samples, and you’ll hear what I mean:
Here’s an example of Alitu’s incredible automatic noise reduction in action.
And here’s how Alitu automatically sharpens up a recording to eliminate reverb and bring your voice ‘on mic’.
Remember, this is all handled for you – in Alitu, you don’t need to learn how it works, or ever hear the term “Loudness Units relative to Full Scale” again in your life 😂
Adding your intro, outro, and music
The video below shows you how to edit your entire episode in minutes, using Alitu.
A big part of this is piecing together segments like your intro, main conversation or interview, along with any ads or CTAs. Then, any intro or outro music can be faded in and out at the beginning and end of the episode.
With your music, you don’t really want any more than about seven seconds at the start, before you come in with your intro. You might love your fancy new theme tune, but your listeners are here to listen to you – so don’t make them feel like they’re on hold to a call centre!
If you’re using Audacity, then the video below shows you how to add your music and piece together your segments in the multitrack editor.
Again, Audacity isn’t complicated; it’s just a lot less streamlined and a lot more hands-on. Maybe you prefer the granular control, it’s totally down to whatever works best for you!
How to export your episode, ready for publishing
Alright then, now that your episode is as ready as it’ll ever be, how do we gift wrap it for the world to hear? You need to turn that editing session into a single audio file.
That’s (shock of shocks!), really easy to do in Alitu as you simply hit the “build episode” button, as shown in my video above.
In Audacity, there are a few more steps and options, but nothing too complicated if you’ve come this far.
In your Audacity project, go to File > Export Audio. A wee window will pop up.
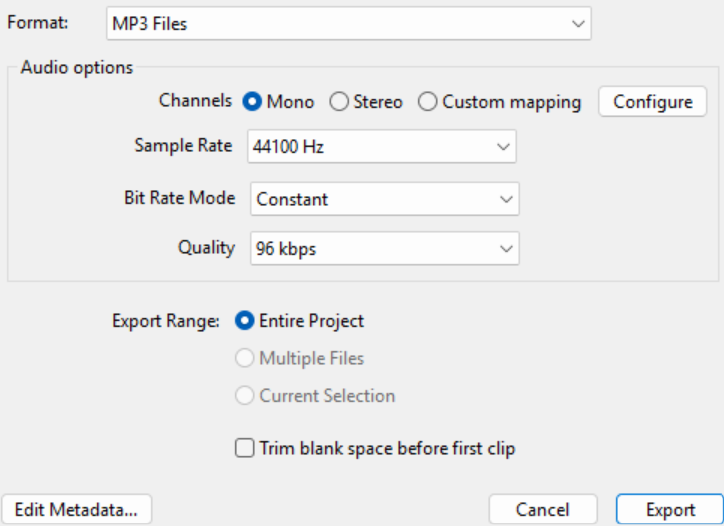
My recommended settings are:
- MP3 file
- Mono
- Sample rate of 44100Hz
- Constant Bit Rate Mode
- Bit Rate Quality of 96 kbps
And export the entire project.
A quick word on bit rates, I opt for 96 kbps on spoken-word mono audio. This balances decent quality with a modest file size. If I’m making an audio drama or highly-produced piece with music beds, transitions, etc, I’d go with stereo at 128 kbps.
So now that we have that audio file, what on earth do we do with it? That’s where podcast hosting comes in…
Step 8: Choose a podcast hosting platform
When it comes to getting your podcast out there for everyone to hear, you’ll need a podcast hosting platform, sometimes called a media host.
What does a podcast host actually do?
This is one of the great things about podcasting – you don’t need to upload your episode everywhere. You create one single account to publish your show, and it handles the distribution for you.
That means you set up your podcast inside your hosting account. You enter the name, the description, choose a category, upload its cover art, and this is the place you’ll upload all your episodes, too.
Our recommended podcast hosts: Alitu, RSS.com, Captivate, Castos
I use a few different podcast hosting providers, and you can read what I think of them in that dedicated roundup. But here’s the TLDR;
- Alitu: Hosting tied in with call recording, audio editing & audio cleanup, plus podcast analytics, transcriptions, podcast distribution and more.
- RSS.com: Superb value-for-money service, fully localised in three languages (English, Spanish, and Italian), which includes customer support.
- Captivate: Growth-focused podcast hosting, with tools like media kit generation, dynamic ad insertion, multiple podcasts, podcast distribution and excellent podcast analytics.
- Castos: a host focused on private podcasting & linked with a strong production service.
- Transistor: another top-quality long-running podcast host with brilliant people behind it.
Can I host a podcast for free?
Yes, you can host a podcast for free on a few different hosting platforms, including Spotify. Though, in my opinion, RSS.com have the best free tier offer out there right now.
If you’re just testing out podcasting to see if it might be a fun hobby, then this will be more than good enough. However, if you start to take your show more seriously and want to grow and monetize, then I’d upgrade to their paid tier, which is superb value at less than $12 a month!
Step 9: Submit your podcast to Apple, Spotify, and other directories
Once you’ve created your show inside your podcast host of choice, you can then link them up to all the listening apps and directories out there. The many places where listeners can discover, subscribe to, and download your show.
How to submit to Apple Podcasts
Apple Podcasts accounts for 36.5% of all podcast consumption from the 114,000+ shows hosted on Buzzsprout. It’s the most popular podcast listening platform, and you’ll definitely want to add your show there.
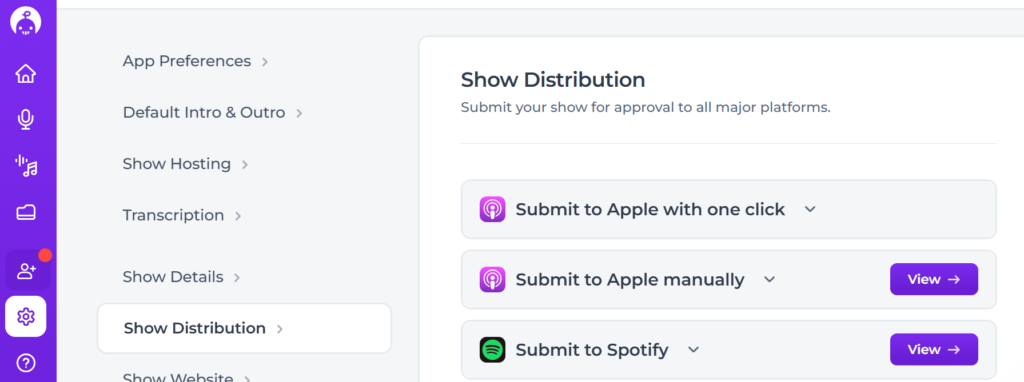
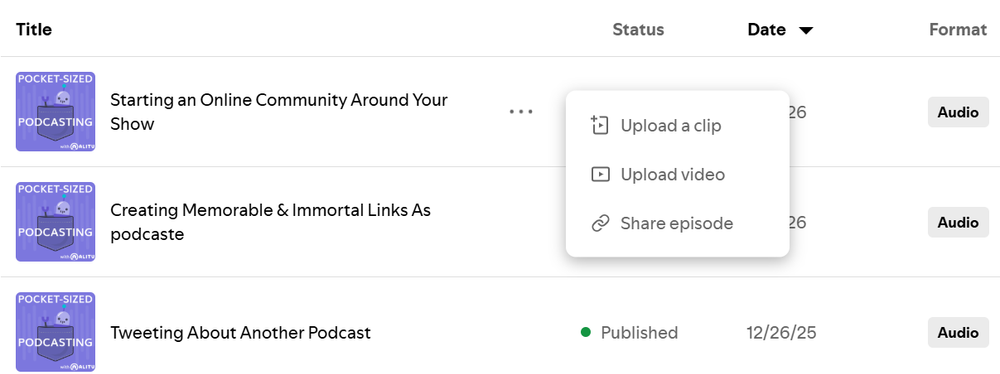
Most hosting providers have a simple one-click ‘submit to Apple’ button in their interface. Here’s a screenshot from inside Alitu.
However, I’d still recommend submitting to Apple manually, because you’ll get access to some brilliant analytics in Apple Podcasts Connect. In the future, this will enable you to calculate a total ‘listen time’ metric that comes in handy if you want to work with podcast sponsors.
Submitting to Apple manually isn’t hard; you just need to go to podcastsconnect.apple.com and have an active Apple account to sign in with.
You’ll also need to have your show set up in your hosting account with at least one published episode (even a 30-second trailer will do). Grab your RSS link from your hosting provider, paste it into Apple Podcasts Connect, and it’s all straightforward. The following video walks you through it.
One of the best things about being in Apple Podcasts is that it automatically puts your show in almost all the other apps and directories. Podcast Addict, Pocket Casts, CastBox, Overcast… they all use the Apple Podcasts API, making mass distribution so much easier for you.
How to submit to Spotify
Buzzsprout shows Spotify a comfortable second behind Apple Podcasts with 27% of consumption share. This is another no-brainer place to submit if you want to maximise your podcast’s reach.
The process is quite similar to Apple’s. Go to creators.spotify.com and log in or create an account.
Click on the user icon in the very top-right corner, then ‘Add a new show’. Then choose ‘Find an existing show’ > ‘Somewhere else’, and paste in your RSS link.
Again, all straightforward, but if you want to be walked through it visually, then start at about 4:09 on the video tutorial below.
One good thing about being in Spotify is that you can get episode comments, run polls, and team up with other podcasters to recommend one another. And they offer some really good analytics, too, including listen time data, audience demographics, and the music tastes of your listeners!
Other key directories: Amazon Music and more
If Apple Podcasts and Spotify account for 63.5% of consumption, and that’s before you consider the many other places you get into via Apple’s API, then you’re pretty well set at this stage.
You’ve maybe heard of Google Podcasts and Stitcher, but these have both gone to that big podcast directory party in the sky and are no longer active.
That leaves a few notable places worth submitting to, but most are clever enough to find your show and list it automatically, especially if you’ve been publishing for a few weeks or months.
- If you’re not in Amazon Music/Audible, head over to podcasters.amazon.com and click “Add or Claim Your Podcast”.
- For iHeartRadio, here’s where you can check the directory, and if it isn’t there, here’s where to submit.
- If you’re not in The Podcast Index, email them at [email protected]
- If you’re not in Pandora, you can submit it through Simplecast Creator Connect.
- If you’re not in Deezer, you can submit your RSS feed directly through Deezer Podcasters.
- If you’re not in TuneIn, use the ‘Add a Podcast’ option in their Broadcaster Portal
Anywhere we’ve not covered? What, like, a place starting with Y and ending in Tube…?
Where to upload your video podcast: YouTube, Spotify Video, and Apple Podcasts
I’ll start off by saying that you can (and should) get your show on YouTube even if you don’t record video. In fact, there’s evidence to suggest that many YouTube podcast consumers listen away from the screen anyway.
Many hosting providers offer an easy “publish to YouTube” option, where they’ll post your new episodes to your YouTube channel as “videos” which simply show your cover art and play the audio. And if they don’t offer this, you can submit your RSS feed to YouTube, and it’ll work in the same way.
The second thing to mention here is that, if you were amazed at how streamlined and synchronous audio podcast distribution is, you’ll be brought right back down to earth by video podcast distribution.
In this fragmented landscape, a video podcaster needs to upload their episodes separately to Spotify, YouTube, and Apple Podcasts (via your hosting provider).
Video Podcasts on YouTube
Go to the YouTube Studio section and click the ‘create’ button in the top right corner. Then, select ‘New Podcast’.
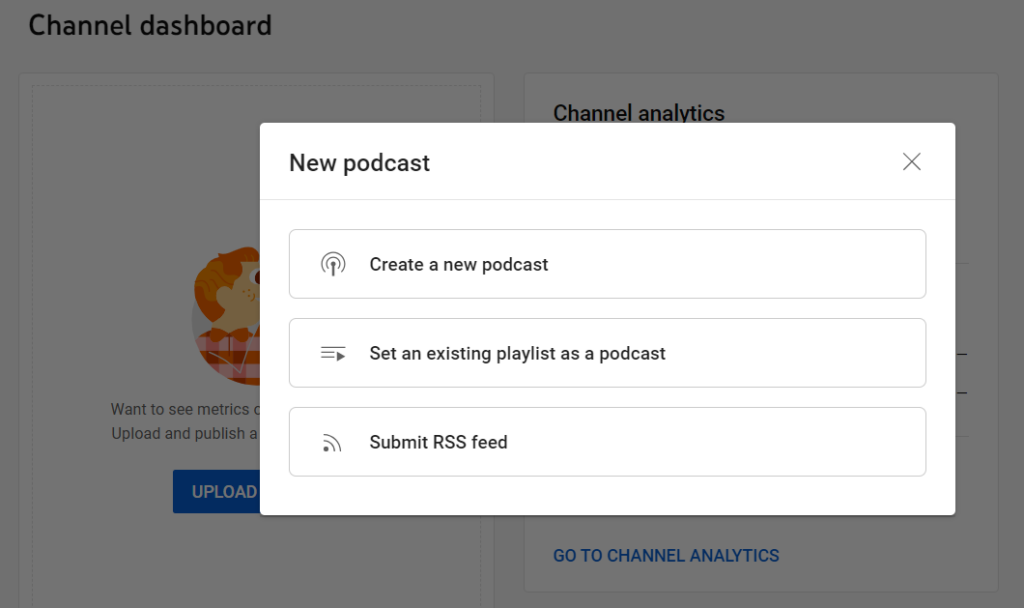
You’ll see three options:
- Create a new podcast
- Set an existing playlist as a podcast
- Submit RSS feed
Submitting your RSS feed is the most “hands-off”. It’ll add your new episodes automatically, though they will be audio-only static image “videos”. If you record actual video episodes, you’ll need to upload them manually and mark them as podcast episodes.
Video Podcasts on Spotify
In Spotify for Creators, go to your episode list, click the three dots beside an episode, and upload a full video version. The video plays exclusively on Spotify and won’t affect how the episode appears in other podcast apps.
It’s worth mentioning that Spotify now pulls the audio directly from the video file, even for listeners who only tune in for audio. This also means dynamic ad insertion is disabled for that episode. Something to factor in if sponsorship revenue is part of your model!
Video Podcasts on Apple Podcasts
To further complicate matters, Apple’s new way of supporting video podcasts does things differently, too.
To be fair to them, this is handled in your media host, rather than having to upload directly to Apple. But, rather than being tied to your RSS feed, this is a technology known as HLS.
Podcast hosting providers that support HLS video include Captivate, Buzzsprout, Transistor, RSS.com, Blubrry, and Libsyn, and that list is growing all the time.
You might have to upgrade your hosting subscription to access HLS video distribution, and, as I’ve said already, you should probably launch with audio-only until you find your feet and your voice. Video can always come later!
Launch with a trailer or episode zero first
You need to have at least one published episode in your feed before you start submitting it. A quick and easy way to do this is to create a podcast trailer, or episode zero. This way, you can ensure you’re listed on all popular platforms in time for you dropping your first “proper” episode.
A podcast trailer should be between 30-60 seconds long and offer a succinct hook for potential listeners – what’s it about, who’s it for, what will they get out of it, and where can they find it?
Five to seven minutes is a decent length for an Episode Zero, giving you a little more room to lay out your plans. Just keep in mind that this shouldn’t be a brainstorming session – come to the mic armed with a confident plan rather than some half-formed thoughts and a lot of “might”s.
Step 10: Launch your podcast and get your first 100 listeners
Once you’ve set up your podcast launch, that’s when you’ll move on to thinking about podcast promotion, building your listener base, and maybe even earning a crust from your show.
Your launch week plan: what to do before and on day one
I know… this is a huge article, but there are a lot of steps to this whole process!
Here’s a handy podcast launch checklist for you now, focusing on the lead-up to your launch, and your show’s first week.
6 tasks
4 tasks
3 tasks
The SCALE framework: how to grow your audience
When it comes to podcast promotion, growth and visibility, I work with the SCALE Framework:
SCALE is a practical framework for sustainable podcast growth. It’s not about gaming algorithms or chasing viral moments. It’s about doing the right things, consistently, in the right order.
Here’s what each letter stands for:
S – Syndication
Be everywhere your audience listens and searches. Submit your show to Apple Podcasts, Spotify, Amazon Music, and YouTube as a minimum. The beauty of podcasting is that once your RSS feed is live, you can reach listeners on platforms you’ve never even heard of. Don’t limit your show’s reach by only showing up in one or two places.
C – Communities and Collaboration
Grow through people, not just platforms. That means building relationships with other podcasters in your niche, collaborating on episodes, swapping trailers, and guesting on each other’s shows. It also means nurturing the audience you already have – running listener surveys, responding to feedback, and building the kind of fan culture that makes people recommend your show without being asked.
A – Advertising
Strategic spend can accelerate growth at the right moment. Podcast listening apps like Overcast are often more effective than social ads for reaching new listeners, because you’re already in front of people who actively listen to podcasts. That said, a creative guerrilla marketing campaign can be just as effective for those without a budget.
L – Live and In-Person
Don’t underestimate the offline world. Events, conferences, panels, and even vox pops out in the street can all put your show in front of people who’d never find it through a search. Real-world connections build a different kind of loyalty than online ones.
E – Email and Engagement
Your email list is your most reliable channel. Unlike social media, it doesn’t rely on an algorithm deciding whether your audience sees what you share. Use it to send show notes, promote episodes, and build a direct relationship with your listeners. Pair it with strong calls to action at the end of each episode – not just asking for reviews, but asking listeners to share the show with one specific person they think would love it.
Try at least a few of these methods in the first few months, and you’ve every chance of reaching far more of your target audience!
What are good podcast download numbers?
Podcast hosting services offer download stats, which help you gauge how your show is doing. You can also get some platform-specific data from the likes of Spotify, Apple Podcasts Connect, and YouTube.
Download stats can become an obsession, especially when comparing yourself to any popular podcast. But there are so many variables when it comes to what are “good” download numbers. You might be surprised to learn that many successful podcasters thrive with “only” a few hundred downloads per episode.
For reference, here’s a handy breakdown of the average downloads of the 114,000+ shows on the Buzzsprout podcast hosting platform.
These numbers are based on the performance of new episodes within the first week of their release:
- Top 1% – 4,611
- Top 5% – 1,012
- Top 10% – 413
- Top 25% – 101
- Top 50% – 28
So if you can get more than 28 downloads per episode, that essentially puts you in the top 50% of all podcasts – a very realistic early goal for any podcaster, no matter their topic or genre.
But ultimately, try not to compare yourself with others. Just try to improve every week, look after those who are already listening, and your show will start to gather momentum!
Can you make money from a podcast?
It’s totally possible to earn money from your podcast, and many do. It goes without saying that you need to put the work in to deliver quality content consistently over a long period of time. But, of course, this How to Start a Podcast guide has helped you lay the groundwork on that front 🙂
Once you’ve built an audience – even a “numerically small” one – there are loads of podcast monetization doors open to you. Here are a few you can try in the early days:
Affiliate links
If you ever mention any products or services they use, you could use affiliate marketing to earn commissions from your recommendations. Amazon has an affiliate program, which can be a good place to start.
Donations
A simple tip jar option for your fans is a low-hanging fruit. Sign up to Ko-Fi or Buy Me a Coffee and make it part of your end-of-episode Call to Action.
Sponsorship or ads
If your topic is quite niche, you could potentially negotiate a sponsorship with a business from episode one. I’ll not pretend this is simple, but if you find the right fit, it can be hugely beneficial to both parties.
Premium & exclusive content
You can use a platform like Patreon and encourage listeners to become paid subscribers. Bonus content is a good incentive – just record an extra 15 minutes each episode and put that section behind a paywall.
Podcast merch
Selling podcast merchandise is arguably more of a marketing tool than a monetization scheme. But setting up a Teepublic, Teespring, or PodSwag store can bring in a small amount of passive income over the years.
Frequently asked questions about starting a podcast
Here are the common questions we get asked about launching podcasts.
How much does it cost to start a podcast?
It doesn’t need to cost anything other than time. You can record for free on your phone or laptop, edit in Audacity or GarageBand, and publish for free using RSS.com or Spotify.
But if you plan to level up, a great mic like the Samson Q2U will cost about $80. You can also get all your recording, editing, and hosting tools under one roof with Alitu for $38/month.
Do I need a website for my podcast?
You can run a podcast without one, but there are benefits to running a website alongside your show – especially if you choose to sell products or services.
Fortunately, you don’t need to be a web designer to get a decent website. Most hosting providers provide one by default, and you can level up even more without any technical knowledge by using a service like Podpage.
How many episodes should I launch with?
You’ll need at least a trailer or Episode Zero live in your feed before you can submit to Apple, Spotify, and the rest. If we’re talking “proper” episodes, three is good for giving new listeners more time with you, but launching with one is absolutely fine.
How long does it take to start a podcast?
The planning stage could be months of thinking, or an afternoon with a coffee and a notepad. The nuts and bolts of recording, publishing, and distributing can all be done in about a week, amongst work and family life.
What is the best podcast hosting platform?
Honestly, there’s no single “best”, just a lot of great options. Check out Cativate, Transistor, Buzzsprout, RSS.com, Castos, or there’s Alitu if you want your recording and editing tools included.
Is it too late to start a podcast in 2026?
For perspective, there are an estimated 1.43 billion websites on the web. At the time of writing, The Podcast Index shows that there are fewer than 4,700,000 podcasts. Many of the biggest podcast hits of 2027 haven’t even launched yet. If you don’t launch, yours certainly won’t be one of them!
Ready to start your podcast?
We’ve covered a lot in this guide so that you’re armed with everything you need to launch. But the good news is, you don’t need to know or do it all at once.
Starting, running, and growing a podcast is a big project when you look at it from afar. But like any big project, it won’t feel overwhelming if you break each step down to simple “what’s next?” bite-sized chunks.
I’m not going to say that nothing about this is hard. Creating a show that people love… growing an audience… that takes work. It’s not easy – but it’s the fun type of work.
And the challenging work should always be in the topic, the content, and the messaging. Tools, gear, and tech should never stand in your way. They’re the means to get your voice out there, and they should do nothing other than enable you.
So I’ll give one final shout-out for Alitu, an all-in-one place to record, edit, and publish your podcast. Even if you’re a complete beginner in the non-techy camp, you’ll be amazed at how simple it all is. Try it free for seven days, and I’m certain you’ll agree!